

By Nan Bridgeman
I love the holidays and putting up trees. I have put up lots of trees over the decades, and not all have been a rip roaring success. When I was a young mother, I got the idea to make a cookie tree with our children. We baked and decorated cookies and hung them by red ribbon on a small tree in our kitchen. It really was cute for a day or two. Then the steam from bubbling pots and pans started softening the cookies. They slowly 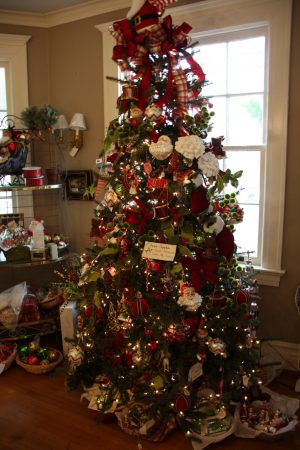 crashed one by one onto the floor. Ugh! The children were upset to see their handiwork shattered, but our two dogs loved hanging out in the kitchen and gobbling up our handiwork.
Over the years I have experimented and learned from pros tips that I want to share with you.
Before you make your tree purchase, you, you must decide whether you are a purist who must have a live tree, or a Christmas lover who keeps your tree up from Thanksgiving until Epiphany. If this describes you then an artificial tree is your best bet.
Real trees have a wonderful smell, and many families love the ritual of finding the “perfect tree” in the field or tree lot. If you go this route, be sure to condition your and tree clippings overnight in a deep bucket. (See the recipe for greenery/tree conditioner at end of this article.)
Artificial trees should look as real as possible. – Avoid “bottle brush” limbed trees, and look for a tree that has a lot of tips. This is information is often listed on the tag, along with the number of lights on the tree. Pre lit trees are costly, but they can save time and nerves for a few years.
First, you will “plant” your tree. Lately I have been using large pottery or baskets to hold my trees as well as tree stands. Select a container or tree skirt that compliments your style. Large trees  might need to be anchored to woodwork with stout fishing wire and eye screws so no calamities occur.
Once your tree is up and stable, it is time for lights. This can be tedious, so turn on holiday music and dive in. A rule of thumb is a minimum of 100 lights per foot of tree. In our area clear lights are the most popular but old fashioned colored lights, even bubble lights can be fun. At the shop, we snake lights up the trunk of our trees as well as stringing them on limbs. I love twinkling lights, as they can help create a magical feel, but leave some lights burning steadily so your tree doesn’t look like a blinking neon sign, which can be unnerving.
Ribbon is a wonderful addition to a tree. You can crown a tree with a collar of fat bows at the top. This year we have Santa popping out of the top of a crown of red and green bows, on our nostalgic “Santa Claus Is Coming to Town” tree. Kiting ribbon through the tree is an easy way to add color and movement to your tree composition. To save ribbon (and money) cut lengths of ribbon and place a floral wire in the center of the strand and pull tight. Then attach the loop inside the branches and “kite” your ribbon tail.
One of my floral reps who decorates shops, banks, and homes of special clients, taught me in order for a tree to have the “wow” factor, it should be decorated using three elements of composition. I know this is beginning to sound like a freshman art class, but read on. It really isn’t so hard to grasp and does make sense.
1. Mass is a large cloud of color that is used repetitively in the tree. Flowers such as hydrangea blooms, poinsettias or a trio of amaryllis can give mass to a tree.
2. Linear is the opposite of mass. It is lines running through tree such and adds drama, height, and contrast to mass. Single stems, twigs, etc. can give your tree this.
3. Filler unites the composition. Sprays can be fluffed to fill holes here and there in the tree.
Ornaments come last.
Solid ornaments unite a color scheme. Hang lots of large solid ornaments in the interior of your tree. If you have small solid ornaments, it is suggested to cluster in groups of three. Repetitive use of solids and matching ribbon is an easy way to unite a memory tree’s hodgepodge.
Story telling ornaments go on outer branches and show the theme. Put your prettiest ornaments at eye level on the outer branches. On our “O Holy Night” tree, once we tucked in our large jewel tone solid balls in the interior, we could place our special hand painted “Holy Family”, Shepherds and Wise Men on the outer branches.
Drop ornaments such as finials and icicles should be carefully placed, so they are vertical for neatness. On our Holy Tree, we hung lots of glittered crosses taking care to keep them vertical.
Garlands go on last, looped through branches.
Once your tree is trimmed, make sure you take time to enjoy it. Make some hot chocolate or if later in the day, sip some eggnog or wine while you admire your handiwork. You have completed your largest holiday decorating task with aplomb.
Nan Bridgeman retired as an educator at a local museum, and owns Blythe Gallery, an interiors shop in Belmont. She enjoys helping customers create their own personal “happy place”.