By Deborah Rosetti
Owner of Bella Rosetti’s Home Interiors
It is the holiday season and Christmas is approaching. It’s a magical time of year where everything sparkles, the smell of cinnamon and apples are in the air and where trials and tribulations of everyday life are swept away under the skirt of your Christmas tree.
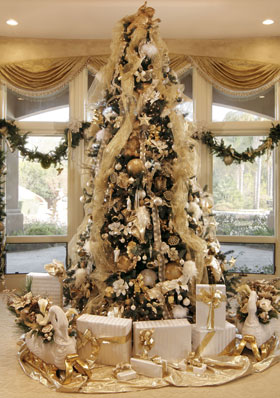
It is the time of year where decorating the tree is a tradition that most of us look forward to year after year and the time of year and the idea ofdecorating is overwhelming. Well, I am here to make things a little easier and give you the 10 steps to decorating a Christmas tree called the Layering System.
1. Decide on the over all color scheme that you would be using on your tree. Consider using colors that compliment your room. Try not to use too many colors; two to three is usually a good rule of thumb.
2. Before decorating add your lights. Many designers use clear or white lights for that professional look. Place them evenly throughout the tree and close to the trunk to give depth. One hundred lights per foot is suggested, but this is the time where more can never be enough especially if you like aheavily decorated tree.
3. The topper is perhaps the most important ornament on your Christmas tree. Classic or alternative, it is the final touch to your holiday design that would make guests stand in awe. Some use heirloom toppers such as angels and stars, but if you want that designer flair, try using pheasant feathers, eucalyptus, sparkling branches, or a combination of the three and fan them out. This will give you that sophisticated look.
4. Use two color branches of pine. This will add texture and color to your tree. Place your branches on top of your tree’s branches and weave them together. Use a longer branch throughout the tree to create distance and provide a space for larger ornaments.
5. Use at least 3 assortments of ribbons in different sizes to make your bows. A solid, texture, and pattern are good examples. Use one of the ribbons to curve in and out of the tree along with a garland to give you depth. A French wired ribbon works best to hold its shape.
6. Now it’s time to add the props. Props are your focal points. They are your themes that tell a story. Use oversized and larger than standard ornaments to get that designer look such as: birdcages, lanterns, and elves. This is the time to use your imagination.
7. Add flowers and natural elements such as hydrangeas, magnolias, berries, pinecones to create decorative sprays and add texture. Magnolia leaves are great because they add shine as their brown undersides acts as an accent color. For the front of a full standard tree I recommend seven clusters.Bundle three stems of artificial flowers, fruits or leaves together and tie the stems with string or floral wire. Move to the right side of the tree and insert another cluster into the branches; secure and then return to the left, creating a tilted zigzag across the front of the tree as shown.
8. Add in any large to mid-size finials and crystals to give it that extra edge.
9. Now it is time to add fillers. These are your smaller decorations used to fill in all the extra space such as: family heirlooms, decorative balls and assorted ornaments. The trick is to nestle them into the tree so that they don’t jut out and look awkward.
10. Last but not least, dim your lights sit back and enjoy.
Have a wonderful holiday season!

